colors

New Life Floor Tile Colors!

We’re excited to announce that we’ve expanded our color palette with two new offerings: Seafoam and Submariner. We’ve carefully chosen these colors to expand our popular blue and turquoise color families. With these new additions, we’re broadening the creative possibilities for our design partners and customers.

SEAFOAM AND SUBMARINER

SEAFOAM AND SUBMARINER

SEAFOAM

Seafoam features a medium teal tone that complements Turquoise and Aqua. Together, the three colors form our new Theme: Surf. On its own, Seafoam is the perfect hue to create designs inspired by beautiful tropical getaways. Paired with Turquoise, Aqua, and our lighter tan tones, this new color can be used to create gradients representative of island seashores. 

SURF THEME: TURQUOISE, SEAFOAM, AQUA

SURF THEME: TURQUOISE, SEAFOAM, AQUA

NATURAL BRIDGE, VA Featuring: Surf Theme  Photo Credit: Inside Edge Safety Surfaces

NATURAL BRIDGE, VA
Featuring: Surf Theme
Photo Credit: Inside Edge Safety Surfaces

SUBMARINER

Submariner is a deep navy that is now the darkest blue featured in our palette. With this new color, we’ve expanded our most popular Theme, High Tide, which also features Ocean, Bluebird, and Aviator. Submariner’s rich tone adds depth to gradients and patterns. We recommend using it with our blue and tan colors to create aquatic-inspired designs. It also works well as a more neutral option to pair with greys or to contrast bright color selections. 

HIGH TIDE THEME: SUBMARINER, OCEAN, BLUEBIRD, AVIATOR

HIGH TIDE THEME: SUBMARINER, OCEAN, BLUEBIRD, AVIATOR

REDFORD CHARTER TWP, MI Featuring: High Tide Theme Photo Credit: Inside Edge Safety Surfaces

REDFORD CHARTER TWP, MI
Featuring: High Tide Theme
Photo Credit: Inside Edge Safety Surfaces

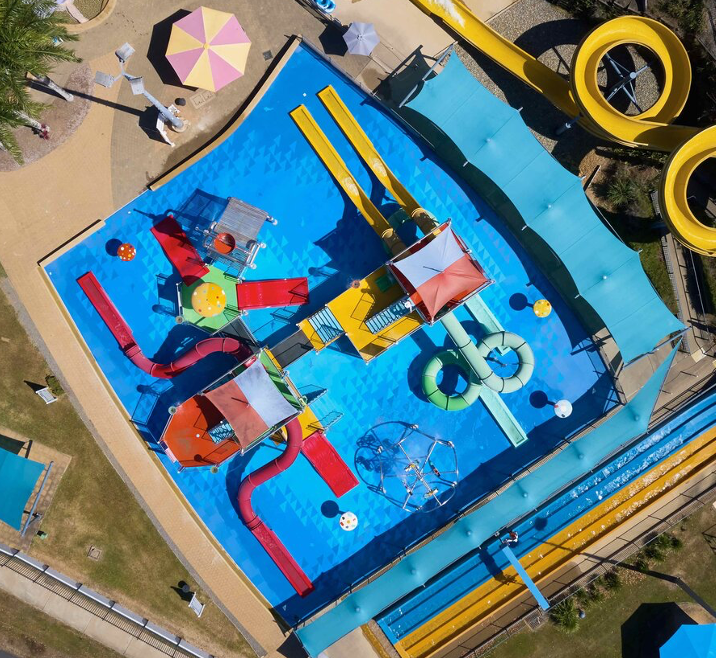
Through a limited release, these new colors have already made their debut on some installations across the country. We look forward to seeing how our expanded color palette inspires even more projects this year. 

DOTHAN, AL Featuring: Submariner & Seafoam Photo Credit: Dothan Leisure Services

DOTHAN, AL
Featuring: Submariner & Seafoam
Photo Credit: Dothan Leisure Services

FAYETTEVILLE, GA Featuring: Seafoam Photo Credit: Inside Edge Safety Surfaces

FAYETTEVILLE, GA
Featuring: Seafoam
Photo Credit: Inside Edge Safety Surfaces

COMPLIMENTARY DESIGN SERVICES

Interested to know what a design using these colors would look like at your facility? Contact us today to have our Studio Team create a complimentary rendering of your project! 

IMG_7777.JPG

A Beachy Transformation in Tasmania

DKHAC_Kids_0195.jpg

The renovation at Doone Kennedy Hobart Aquatic Centre in Tasmania began during 2020’s mandatory COVID-19 closure and included many updates to the facility including adding approximately 480 square metres of Life Floor on the surface of a large zero depth entry play area and on some of the walls and stairs to increase cushioning. 

The new pool has already had a rousing response from our first young visitors, who absolutely loved it. The new slide and bucket play space is an exciting area for the bigger kids, but there’s also a zero-depth splash-pad with water features, which is suitable for babies and toddlers.
— Anna Reynolds, City of Hobart Lord Mayor
Doone Kennedy Hobart Aquatic Centre in Tasmania

By installing Life Floor on their surfaces in different zones of play, the aquatic centre was able to capture added value for patrons of varying ages and abilities.

Doone Kennedy Hobart Aquatic Centre in Tasmania

This Seashore Theme is arranged in a custom pattern replicating a beach with shallow water. Given Hobart’s temperate climate, this indoor haven is perfect for families who want to enjoy a beach day any day of the year. Marine inlays have been interspersed throughout the area to spark childhood imagination and increase overall play value at the centre.

Doone Kennedy Hobart Aquatic Centre in Tasmania

Thank you to the Doone Kennedy Hobart Aquatic Centre for installing Life Floor and increasing safety and play at your facility! To learn more about how to get Life Floor at your facility in Oceania, please visit Life Floor Australia + New Zealand’s website

For other international regions, please visit our international team page. For North American projects, please contact us directly.

Our Top 5 Life Floor Design Tips

While our Studio Team is happy to create design renderings for our clients, many customers and partnering designers have expressed interest in creating their own flooring designs. For anyone looking to get started with their own Life Floor projects, we’ve put together five of our top design tips to help guide the process! 


Include Three or More Colors in Designs 

We’ve found that designs containing three or more colors look best after installation. As an added benefit, they minimize visibility of debris or regular wear over time. This concept is similar to how complex carpet designs are applied in high traffic areas like casinos. An intricate or varied pattern will hide most imperfections. In contrast, any debris or marking on a solid field of color will be very apparent. We know it’s impossible to keep pool decks and splash pads absolutely spotless all day so this technique helps aquatic facilities continue to look their best. Multi-color designs also enhance spaces where they’re installed by creating vibrant and interesting patterns at the surface level. These designs are vast improvements to drab fields of grey concrete! They lend themselves to great theming opportunities as well.


Design within Project Budgets

While the sky's the limit for some customers, most are looking to stick within a specific budget. With a wide range of design and pricing needs in mind, we’ve created a variety of shape and color options to accommodate an array of project types.  

Our tiles are available in four shapes - squares, triangles, rectangles, and hexagons. Our square tiles are the most cost-effective option both in terms of material and installation costs. Triangles and rectangles have very similar material costs (since they’re just half squares). It’s important to note that they are slightly more expensive to install since more pieces are involved and the designs are typically a bit more complex. Of all of our shapes, hexagons are the most expensive.

Beyond these standard tile shapes, we can also custom cut our tiles into just about anything - curves, logos, games, images, you name it! These unique designs look great but use more material, require more factory preparation, and take more time to install so they’re generally the most expensive. 

Choosing an area as an accent piece can also enhance facilities within budget. This focal point can add visual interest to an entire project while also keeping the overall cost lower by using a simpler design throughout.

There are many ways to mix and match our tile shapes and colors to achieve a great project look. Hopefully these basics help inform some of the best opportunities to create some stellar designs that are also affordable at any price point!


Use a Staggered Grid for Tile Layouts

Staggered Grid

Standard (Checkerboard) Grid

While most people generally assume that our square tiles are best arranged in a standard (or checkerboard) grid, we actually recommend designing with our tiles on a staggered grid. We’ve found that this layout is ideal for ease of installation and maximum durability over time. Layouts that use standard grids are still a beautiful option; however, we generally recommend designing with them only for smaller applications or for designs that really rely on the checkerboard tile layout for a distinct pattern or look. 


Accent Designs with Theming and Play Options 

Are you looking to add some sea creatures to your splash pad design? No problem! We have several pre-designed thematic inlays, like fish and crabs, that fit within single square tiles. We can also cut larger creatures, whales or dolphins for instance, across several tiles. 

Want to add a game into the surface? We can custom cut nearly anything into Life Floor. Some popular choices have included hopscotch and checkerboards.

For branding opportunities or to include a facility’s logo within a design, we can precision cut all of the parts in advance at our factory. They arrive ready to install to ensure brand accuracy and a smooth installation process on site. A great example of a large-scale logo we’ve created recently was one that we produced for the Fun Spot splash pad in Orlando, FL. The finished product and a diagram showing all of the precut parts are pictured above. 


Take Advantage of Our Online Resources

Did you know that there are helpful resources on the Design Studio page of our website related to creating designs with Life Floor tiles?

For design inspiration, our Portfolio and past Lookbooks are great places to start!

One of the most popular resources we have posted is a chart that shows color equivalents for all of our tile colors. If you design in Adobe Illustrator (like we do), the Hex codes are very helpful to get the colors in your layouts as accurate as possible. 

Our pre-established color palettes and tile patterns have been popular options for our customers. Head to the Themes and Patterns pages to explore these designs. We even have downloadable templates that can be used in Adobe Illustrator for anyone looking to cut and paste these options into their projects. Use one of these as designed or vary it slightly to cater it to your project!

To get started with a scaled tile grid to represent Life Floor in AutoCAD, we have templates that include hatches for both Metric and Imperial designs. 

Looking for technical details to better understand how our tiles integrate during installation? Those are available on our Specs + Resources page as well! 


While the tips above cover our major suggestions, these are only some of the best practices we’ve established over the years! Want to learn more or have questions for our Studio Team? Feel free to email us at design@lifefloor.com. We love partnering with designers and take great joy in seeing what other great projects are dreamed up by other companies around the world!

Interested in our upcoming Designing with Life Floor Guide?

Sign up below to receive access in advance of it going live! 

Designing with Life Floor's Tile Shapes

Did you know that Life Floor comes in four standard shapes? Our tiles were originally manufactured as 24” square tiles, but rectangles, triangles, and hexagons have been developed over the years. With these shapes, our Studio Team and partnering design firms have been able to imagine an endless range of possibilities for aquatic facilities around the world. Through countless different configurations and color combinations, our tiles enable opportunities to create beautiful environments with unparalleled safety benefits. Explore the design options available with our standard shape offerings below!


Squares 

Life Floor Squares
Life Floor Squares
Life Floor Squares
Life Floor Squares

Our square tiles can be arranged in randomized multi-color fields to evoke environmental elements like sand and water. They can also be configured in colorful gradient patterns using a range of tones from our palette. For a more classic design, squares look beautiful when arranged in a checkerboard grid. For a more modern effect, square tiles of the same color can be installed consecutively to form long, rectangular configurations. Some facilities have even opted for a staggered zig-zag pattern. To add even more visual interest, customers often request thematic inlays that fit within a single tile. While the original shape of our tiles may be simple, it is filled with the potential to create both beautiful and cost-effective design solutions!


Triangles 

Life Floor Triangles

Simply by cutting our square tiles diagonally to form right triangles, we’ve created an array of new design opportunities. These tiles have been the most popular choice when creating gradient effects, especially when mimicking coastlines. They’re also an excellent choice for adding accents of color around a facility. For a more geometric approach, mirrored triangles can be arranged to create an even larger pattern. Images like pine trees can even be created in a surface design by combining triangles with our rectangle and square tiles!


Rectangles 

Life Floor Rectangles

Our rectangular tiles present the opportunity to design with a popular 1’ x 2’ grid or to create long plank effects by aligning tiles of the same color in a row. They enable designers to create more modern, geometric patterns. Similar to our other shapes, rectangles can be arranged in gradients or they can be used to break up solid fields of color with bright accents. Due to their size, rectangles are a popular choice in smaller spaces like locker rooms. Try varying the rotation of these tiles to achieve a dynamic look. 


Hexagons 

Life Floor Hexagons
Life Floor Hexagons

In 2019, we unveiled the newest addition to our shape collection: the hexagon. Our Studio Team loves how this playful, geometric shape transports visitors to colorful landscapes with intricate and delightful patterning. Our hexagon tiles add immediate visual complexity to any space, without the need for additional design work or custom cutting. They can be used in more natural designs to mimic the look of a sparkling body of water or a varied landscape of grass, dirt, and rocks. Hexagons also lend themselves to radial designs and are perfect for splash pads.


While these shapes encompass our standard options, Life Floor tiles can also be cut into virtually anything! We commonly install curved designs, logos, custom shapes, and inlays. Is there a new standard shape you’d like to see us offer? Let us know in the comments section below!